Pages

Tuesday, September 18, 2018

handy totes from produce trays

Why buy plastic organizers? You can get free corrugated fiberboard organizers at your food store.

If you have access to your grocery's packaging discards, you might experiment with produce trays.


Produce trays which carry fresh fruit and vegetables can be very sturdy. Some are even waterproof. Some have interlocking tabs to help them to stack. Some are beautifully made and very durable. They come in a variety of sizes.

I am finding them very handy for organizing my stuff.

They are free. They need recycling but reuse is even better!

I glued and screwed scrap 1x2 pine to the short ends to act as reinforcing handles. You could add these instead on the long sides? You can paint the trays (the ones without the glossy coating).

Some have holes in the bottom so another sheet of cardboard could be added if you expect small items inside? I am using discarded plastic clam shell cases here for small parts. [click any pic to enlarge]


Recently I have been building carts to hold a number of the larger trays. The whole cart is made from recycled wood.

This one is being used in the garage as a mobile tool cart.

This one as a laundry cart.


Thanks for your interest.

George Plhak
Lions Head, Ontario, Canada

Tuesday, September 11, 2018

heat 4 - the new furnace

INDEX to the series

The new furnace has been operating here for the last two days taking the chill off cooler night temperatures.

Very quiet! Should use much less electricity. I intend to show how much less.


The installation techs had two visits ripping out the old oil burner/tank and installing the new propane furnace. Another visit tomorrow to correct some minor deficiencies identified at the "gas check".

I found it interesting that another company, in this case, my propane supplier who this summer installed my propane service, inspected the work of the furnace installer and did a leak down test. A gas pressure meter with high resolution is attached temporarily to a port at the tank regulator, the system filled to recommended pressure then the tank valve closed off. The pressure is watched for 15 minutes to note any drop. They did find one very minor leak outside, at the fitting to the regulator. It wasn't dangerous but it would have wasted gas. It was fixed with a bit more torque on the fitting.

This series is about my home electric energy use. My former heat source, a 1994 vintage Brock oil furnace burned fuel oil for heat but used up to 700 watts of electricity while it was running to power two motors and the spark igniter. One motor pumped oil and air into the burner, the other pushed air through the house. The igniter ran all the time there was flame, even after ignition.

The old furnace ran up to 35% of the time when the outside temperature was -15C. See the previous article Heat 3. My metrics to compare are the duty cycle at a given outside temperature and the energy drawn. Once I know these for the new Lennox EL296E 96 AFUE furnace monthly over the winter, I should be able to compare new to old to see how much of an improvement has been gained.

[click any pic to enlarge]

The burner motor in the Lennox is a conventional capacitor start motor but it is tiny - 1/20 HP! The diameter of the body of the motor is about three inches. A sewing machine might have a motor of this capacity. This motor supplies combustion air from outside to the gas burner.

In the oil burner, the corresponding motor also pumped oil as well as air to the flame. I believe it was 1/2 HP single speed. Because propane is pressurized in the tank, there is no need to pump.

As promised by my supplier, it has two speeds. Unlike the single speed oil burner and most gas units, this Lennox has two operating levels for the burner - High and Low. So I will have to watch the usage to identify the two, they may have different current draws. Supposed to provide efficiencies when little heat is required. Most of the time in winter Canada, a LOT of heat is required! It will run on high most of the time I think.

I will have to find the motor start capacitor that is attached to the two brown leads (shown on the lable). A failed motor start capacitor is an old time problem that could happen to this new motor after a few years. And an easy fix if you have a replacement capacitor, a few dollar part.

The house air mover motor is the bigger of the two at 1/2 HP. It is deep inside the bottom of the furnace but I can see it if I take out the air filter and look in the opening. I am actually taking this picture with my hand in the air duct!

This Endura Pro motor is from Genteq. It is indeed an ECM "Electronically Commutated Motor" which is supposed to save energy. It is also variable speed.

More on ECM later...this is an introductory tour.

The new furnace does not have a pilot light! When it is OFF, no gas is used.

I also have a new thermostat, a Honeywell T6 Pro which I am getting used to. Mine is not wifi connected but is a high end conventional programmable with the latest Honeywell baseplate and new multi-condutor wire to the furnace where previously there were only 2 wires. I now have a C-wire (or common wire). I believe I can upgrade just by plugging in a Honeywell Lyric T6 Pro but haven't decided to do that yet. I am most interested in verifying energy usage rather than control and I am not convinced that Lyric (or any of the others?) will help me do this.

The Lennox control board is about six inches square, located behind two covers. The thermostat connections are at the bottom. The micro computer is the small black rectangle near the center. I was not able to read any markings on it. The single 7 segment LED readout and the one single button are just up and to the left of the micro. This is a real mixed media board with surface mount and high power connections, spade lugs, Molex type connectors and some conventional size capacitors and a relay or two. Probably typical for a high power consumer appliance. It is marked Lenox under the wires at the top right so is a proprietary board.

This board is about 18 inches off the floor so to study or work on it means a very low stool to sit on or crouching on your knees.

I was joking about the error codes and a friend had asked me if there was a computer interface, like a USB port. I didn't see one. But there are about 25 status/error codes that show on the LED if required. I think you have to push the button to display.

I did my first mods!

The door that covers the big new filter didn't have a handle and was very difficult to open with fingernails so I added a solid brass handle!

Once the door is off the filter is in the opening and very difficult to remove since it fills the opening almost completely. Again, fingernails don't really work.
So I added a folded tab of packing tape which makes the filter easy to pull out to inspect. The tab folds flat against the filter when the outer metal cover goes on so it is out of the way.

Both work great!

The filter is supposed to last six months. I am to look at it once in a while. Mine already had a few big dead bugs in it.

If they made it easier to look at, people might look more often!

More on the guts of the new furnace later...

I have lost my ability to see my overall electricity usage. The McMaster University program has ended. My Blueline Energy sensor no longer works. That will be another story. So I cannot yet see the electrical usage of my new furnace.

Thanks for your interest

George Plhak
Lions Head, Ontario, Canada

INDEX to the series

Saturday, September 08, 2018

dehumidifier 2

INDEX to the series

My new small dehumidifier has been working hard in the basement using almost 94 kWhr in August!

Working hard and getting results but with high electric usage I hadn't anticipated yet less than I calculate.


Results: The freezer has no condensation. The puddle that once lived under the old freezer is long gone and the floor is desert dry. The basement seems slightly warmer and smells fresher.

The energy graph for the dehumidifier's plug looks like this, from the Itead EWeLink app. 93 kWhr for the month of August! Or 2-3 kWhr per day. I haven't loaded the tiered prices by time of day so there is no dollar amount.

This is a huge chunk (about a quarter) of my monthly usage of 355 kWh for August. Hydro One nags me about it on my August bill! Your usage has increased by 38% compared to the same period last year! They are right! It is because of this dehumidifier.

Another effect is an increase in both On-Peak and Mid-Peak usage since I am not controlling the dehumidifier for time of day. It runs when it wants to. I'd like to see how it behaves without that added complexity for now.

I am visiting the basement several times a day because of this dehumidifier. Good stair climbing exercise. It will have to be made more automatic but I am enjoying seeing the result of it's work.

I am surprised at the amount of water produced even at the the relatively "low" humidity setting of 70%RH. I have to carry a bucket a day out of the basement or it stops running. I can empty the machine into the bucket three times but then I have to carry it out.

The dehumidifier uses 400 watts when it is running and it runs a lot, even at 70%RH.

This data [click to enlarge] shows the outlet temperature of the Danby dehumidifier over one week Aug 4 to Aug 12 from an Elitech RC-4 temperature data recorder. The black areas show when the dehumidifier is running. When it runs, the instantaneous usage shown by the Itead is 400 watts.

When not running, usage is 0.58 watts. The longer gaps of not running are when the internal reservoir fills and it shuts off because I have not emptied it.

Towards the right end of the chart is when things are working more of less properly, the bucket is getting emptied and the machine is catching up with it's 70%RH set point. If I try to set lower, say 60%, it runs more or less continuously until full. I cannot separately measure RH% of the basement air. I should have a way to do that.

Heating season is starting so I expect that the furnace will soon keep the basement dry. The dehumidifier should work less and I expect I will retire it for the winter.

The new furnace (which I have yet to tell you about) has a condensate pump so I might connect the dehumidifier into that pump. The furnace and the dehumidifier should run in alternate seasons. I have a spare of the same pump.

Thanks for your interest

George Plhak
Lions Head, Ontario, Canada

An update on the energy required to operate my dehumidifier:

The energy used by the dehumidifier is 93kWhr for August as taken from the Itead S31.
93kWhr is equivalent to 334800 KJ (using the Google unit converter)
I was not so careful about measuring the water but I'll use an average of one bucket per day. For the weight of this average bucket I'll use 8.4 kg H2O per bucket as before although the last bucket was destroyed and the new one is very slightly smaller. August has 31 days so 31x8.4= 260.4 kg H2O was produced in August by the dehumidifier at a "cost" of 93kWhrs.
Recall: The Latent Heat of Vaporization - the input energy required to change the state from liquid/vapor at a constant temperature - for water 2260 KJ/kg.
The energy to condense 260.4kg of H2O as required by physics would be 260.4x2260= 588504 KJ
I used only about half that amount so something is not right.
Your comments/suggestions are appreciated - what am I doing wrong?

A homework type help reference


INDEX to the series

Monday, August 27, 2018

efficient workshop lighting 2

Lighting a work area in a pleasant, safe and efficient manner is about more than just changing light bulbs. I have changed some bulbs, added a few, tried new LED plug in florescent replacements and cleaned the rest. Big improvements! Low cost once you have modern electronic ballasts. Re-use the existing steel box which is often superior to what you'd buy new.

This is a view of my fabrication shop with ALL the lights on. [click any pic to enlarge] The lights in this room are almost NEVER All On. One of my principles of efficient lighting is to only use what I need. I have five lighting "zones" in this one room so I can have the amount and location of lighting that I need.

I switch my lights manually and I am pretty good at remembering to turn off when I leave the room. I tried motion sensing switches but they annoy me. None of these lights are network controllable, all are manual!

When I arrived here five years ago, there were four dual 40 watt T12 florescent lights on the ceiling switchable in two banks. The lights were along the sides of the room. The lamp fixtures were old and some of the lamps didn't work. Some of the fixtures had already been reused and were painted deep red.

Switching on the lights caused interference on my FM radio. See exploring efficient workshop lighting alternatives The title picture is approximately the same view as this article, five years ago (called P2 on the plan below).

Those four fixtures are in the same places (the green and the red banks) but they are now completely rebuilt with new electronic ballasts, new T8 32watt lamps and new lamp mounting posts.

Originally, there was no light in the center of the room. I added a circuit to the panel for an "island" in the center of the workshop ceiling with switchable lights (purple and yellow on the diagram) and a hanging power pendant. Both the lights are controlled with pull switches. Yellow is a High Output (HO) dual 50 watt T5 florescent (100 watt total) and purple are two LED bulbs, each 10watts (20 watt total).

The two LED bulbs provide the lowest level of illumination in the room at a cost of only 20 watts. Perfectly adequate basic illumination from two points near the center of the room.

Later, I added another pull chain controlled dual four foot 32watt T8 fixture over another bench in the bottom corner (blue). This is the fixture I used for the test below.

At move-in the ceiling was dirty white. I painted the ceiling with two coats of pure white latex in patches as I removed fixtures for rebuilding. Now, after four years, the ceiling is again turning a dirty white but not as bad as it was. I should probably repaint it.

Taking down and cleaning the now four year old T8 bulbs has made a huge difference in the room brightness.

The lamp showing the lettering was facing down, the other one is showing the "up" side, the side you normally don't see, the side facing the fixture. The accumulated dirt/dust cuts down the amount of light leaving half of the lamp.

Cleaning! So simple yet so effective! A lot of climbing the ladder in the last two days as I inspected and cleaned the eight fixtures that are now on the ceiling.

I also tried two new LED "instant replacements".

From Philips "InstantFit T8 LED, C$12 each at Home Depot. I bought one each of "daylight" (6000K) and cool white (5000K) so I could compare them. I had intended to buy two of the 6000K and that is what I will end up with since I have decided to return the 5000K after trying it out. The Philips 6000K seems subjectively brighter to me in my shop environment.

I bought Philips 32W replacement LED lamps a couple years ago and have been using them in the paint area. I have been pleased with them, judging them to be similar brightness to 32W fluorescent lamps but instantly full bright but twice the price. I believe two years ago, the Philips LED lamps were on sale at C$30.

I notice that now, the Philips lamps are glass. The earlier ones were encased in a plastic tube which would bend just slightly. The new Philips tubes also have lots of warning labels including about fire hazard. Perhaps the glass is needed for high temperatures? The lamps certainly do get warm, almost as warm as florescent.

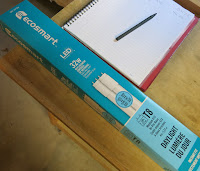
The second type I tested was from Ecosmart, their 32W LED replacement (rated 20w each lamp), two in a pack for C$15 also at HD. Also glass. Far less warning info. Very bright!

Curiously, Ecosmart calls their bulbs "daylight" at 5000K. The naming of color temperature is a bit of a wild west I think, the degrees Kelvin should be a better guide or actually comparing in your own environment. Some time ago I did a piece on comparing conventional, compact florescent and LED bulbs and compared some of the visual effect of different color temperatures.

I installed the Philips and the Ecosmart bulbs in several different fixtures here but made measurements at bench height from the blue fixture


Comparison of lamp types
LampBrightness FCTemp (5 min)
Philips ALTO 32w florescent4635C
Ecosmart 20w LED5233C
Philips 17w LED36.526C

The Philips are not as bright as my typical T8 florescent. The Ecosmart is the brightest. The Ecosmart uses less power than the florescent, but more than the Philips LED.

Temperature was measured with an infrared temperature meter. Brightness was measured with a footcandle meter.

One detail of the comparison is that the LEDs came to full brightness immediately whereas the florescent takes several minutes to come to full brightness. Even longer at near zero temperatures. So the LED has a real advantage in my shop in winter.

Another detail is that general ceiling lighting is good for benchtop brighness but several of the machines, even with light fixtures directly over them, regardless of lamp type, need work lights ahead of the blade since the machine itself shields some of the overhead light. The band saw and the radial arm saw are examples that will need more attention for better safety.

Thank you for your interest,

George Plhak
Lions Head, Ontario, Canada

shop lighting reading list
a parabolic workshop light
led household bulbs
exploring efficient workshop lighting alternatives
work light led retrofit
testing fluorescent light fixtures - the test jig
testing fluorescent light fixtures - the test method (video)
testing fluorescent fixtures - 40 watt
efficient workshop lighting 2 (this article)
updated bench lighting

Tuesday, August 14, 2018

what's an oscilloscope?

I had a couple guys here installing a high tech propane house furnace. Renovations also going on. The house is chaos. I had my Tektronix 7854 and 7L5 in the living room on the cart. One guy asks what it is? I reply the first oscilloscope with a computer. What's an oscilloscope? he asks. It lets you see electricity I replied. He seemed happy with that. Age about 40. What's an oscilloscope?

Thanks for your interest.

George Plhak
Lions Head, Ontario, Canada

Wednesday, July 25, 2018

dehumidifier

INDEX to the series

I have added a small portable dehumidifier in the basement. So far, it makes lots of water and uses a ton of electricity.

After setting up the new freezer in the basement last week, I noticed that there was condensation - ice and water drops - more than a bit - in the area of the door seal and a coating of condensed liquid water mist on the front surface of the appliance.

This was not a surprise. The old freezer used to "sweat" in summer when the air humidity was high. Perched on 2x4s, the old freezer lived over a perpetual water pond. It's top lid was covered with condensation that ran down whenever it was opened. This water was constantly recycled within the basement, no possibility of escape.

I don't have air conditioning in the house. The freezer is much colder than anything in the basement so acts like a magnet for water in the air. I keep the basement door shut and the one window does not open so the basement is relatively shut off from the outside. Mine is an old house and there have been and perhaps still are water problems. Would I be able to dry out the basement at a reasonable energy cost? I had a dehumidifier but haven't used it. I decided to try running it to see the effect on the freezer external condensation.

The old Danby dehumidifier roared into action but unfortunately did not work. No water appeared in the unit after an hour. It made cycling noises and clicks and drew high power for a second and then nothing but the fan running. It was behaving as if the compressor wasn't starting. I took it to recycling and paid $35 to deal with the Freon.

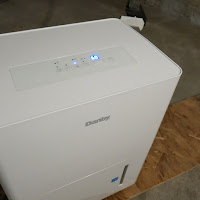
So I bought a new mid size portable dehumidifier, a Danby DDR045BBCWDB 21L / 45 US pint rated for areas up to 2500 sq ft "depending on conditions". My home is approx 1250 sq feet by the real estate definition yet I am more concerned with the basement space which might be 1000 sq ft including the crawl spaces, none of which are included in the real estate definition. So I might be overpowered with the model I chose.

Danby shows the Energy Star logo on the product and packaging. Uses R410A refrigerant. Very slick appearance. Does not deserve to be on my basement floor.

Following are some reactions and observations based on a couple of days only.

I set it up first on the kitchen table the better to admire it and learn. This is really a nicely finished product. Made in China. Lighter than the 20 year old metal cased unit it replaces, this one is almost entirely plastic. Almost everything you see on the outside, the removable bucket and what you can see inside is made from plastic. There must be metal inside in the compressor and coils. I was tempted to lift the cover but I didn't.

The instructions warn that the unit may not start when you push the power switch the first time and mine did not. I feared that I may not be able to inhibit the running of the unit during peak pricing periods as I had hoped to do, using my preferred outlet switch/energy monitor Itead Sonoff S31. When power was applied to this dehumidifier, it justs sit there until the power button is pushed. Someone has to start it manually. It is smart. It has a computer inside! A line in the data sheet says "Auto Restart: unit automatically restarts after a power failure" so there is hope. I haven't tried yet to interrupt line power with the S31.

The purpose of the dehumidifier was accomplished. After about ten hours running continuously, the condensation on the new freezer reduced and in another ten hours or so, after a bucket or two of water was produced, the freezer shows NO condensation on the outside or around the door seals at all.

A LOT of water is produced. In just over a day and a half, I have removed three large buckets of water from the basement! That's a bucket every 12 hours or so. To get an almost full bucket, I empty the dehumidifier "bucket" into the larger bucket about three times.

There is no drain in my basement so carrying the large bucket once is preferable to carrying the internal bucket upstairs three times. The water goes into a toilet upstairs and hence out of the house. I have a "sump" in the basement floor but dumping the water there would be equivalent to pouring it on the floor. Water has to leave the basement and the house to be removed effectively from the air.

The unit will discharge some water when the internal bucket is removed so I don't want to go far with it. I am also finding removal/insertion of the unit's bucket a bit troublesome at ground level so I am thinking of raising it up somehow with a stand and tray for water spills.

So far I have used 12 kWh as I can see from the S31 to which it is connected. That is a lot of energy and makes my humidifier potentially a major appliance, at least in the summer.

It averages about 400 watts with the fan set to run FULL. I was surprised and I hope that sometime soon it reaches an equilibrium so that the unit does not run all the time. I think I have it set to 50% relative humidity.

When first started in the basement, the display was about 75 so I am guessing this is the RH that is measured? When I push the left right buttons, the display changes to the set point value and jumps 5% steps with each button push. Danby recommends 45-50% so I am starting with that and letting it run 24/7.

So here is a little calculation based on three buckets of water and 12 kWh used. I don't think it is quite right and it certainly is very approximate. Your feedback is welcome.

The Latent Heat of Vaporization - the input energy required to change the state from liquid/vapor at a constant temperature - for water 2260 KJ/kg

Using 12 kWh is equivalent to 43200 kilo-joules. Should be enough energy to evaporate or condense 43200/2260 = 19.12 kg of H2O

1 L of H2O = 1 kg

So 19 L of water is about 5 US Gallons

My 3 buckets each weighed about 9.1 kg. The empty bucket weight was 0.7 kg. Use 9.1 - 0.7 = 8.4 kg H2O per bucket

Total 3 x 8.4 L - 25.2 L

So I got more water than I should have, by about 25%?

One thing I know is not correct is that the Latent heat of Vaporization at 1 atmosphere should work at 100 degrees C and there is no way the Danby has heated the water to the boiling point. I need to learn more about humidifiers and how the Energy Star rating is applied. I did not receive an EnerGuide card in the box nor can I see one on the Danby website.

The temperature of the basement seems to be rising slightly, about 2-3 degrees C since I started running this dehumidifier test, probably because of dumping in excess of 12 kWh into the basement air?

Another benefit of lowered air humidity might be reduced ice buildup inside the freezer. Every time I open the lid, the freezer receives a blast of moist air from the basement. If the air is dryer, less ice will form inside on the walls.

Thanks for your interest.

George Plhak
Lions Head, Ontario, Canada

PS - the Itead ewelink S31 display for the dehumidifier only shows a couple of days and the total. I notice that the app now says kWh where before it showed the degree symbol. Progress is being made at Itead!

PPS - near drought conditions here so I am watering the garden plants with the recovered water rather than putting it down the toilet, even though it is distilled water and thereby lacking minerals. I am sure the plants won't mind.

INDEX to the series

Saturday, July 14, 2018

freezer 2

INDEX to the series

A new small chest freezer was delivered here and put into service yesterday.

Impressively quiet and efficient, my new Danby freezer might be half the weight of the old 1994 Wood freezer that it replaces although they are both the same capacity.

One large delivery guy carried the new boxed freezer from the truck on his shoulder and then slid it gently down the stairs by himself! It then took him and another with a dolly to haul the old Woods away.

Both new and old are the same capacity 7 cubic foot chest freezers separated in time by 25 years.

My freezer is plugged in through an Itead Sonoff S31 which gives me this kWh/day chart through my wifi and control of the outlet in various ways. The kWh/day chart is for June, the last full month of the Woods freezer so we'll have data to compare.

I had updated the Itead app for both iPhone and Android this morning and there are a couple of curiosities. I was surprised to see a degree symbol where I'm pretty sure it means kWh. I had installed the S31 at the freezer outlet on the last day of May so the 0.31 for May is only part of one day. I have not loaded a cost per kWh in the Itead app ewelink since I only need the kWh but the app could calculate the total cost.

So for June I used 26.85 kWh in total for my old freezer, about 0.9 kWh per day. Considering that my whole house used about 8 kWh per day in June, the old freezer was 11% of my usage. My "much newer used" 18 cubic foot refrigerator uses about 0.6 kWh per day. I monitor/control my refrigerator on another S31.

The peakiness of the bars is interesting. Each pair of taller bars shows a weekend when I let the freezer run all day since there is no Time of Use peak priced power on the weekends or holidays. For regular Monday to Friday I use the timer of the S31 to keep the freezer OFF during the peak periods. Currently my utility's peak period is 11am to 5pm so my freezer is OFF for 6 hours when electricity cost here is twice the non-peak rate.

I don't buy peak priced electricity for my freezer and I use less electricity, saving about 10-12% on each day I inhibit operation during the peak period. The freezer has to "catch up" for the time it has been off, but it does not use as much as if it had been ON the whole time.

I can also see that the freezer uses less electricity on Mondays! I guess it catches up on the weekend cheap power so takes a bit of a break?

One thing about my freezer and possibly most freezers is that I don't open the door very often, maybe once every couple of days. If the door got opened often and items loaded or removed, the kWh usage would be more scattered, less regular.

So what happens to the temperature in the freezer when the power is turned off for six hours? I knew you were going to ask.

[click pics to enlarge]

This is the temperature inside the Woods freezer last August one hot day. I am using an Elitech RC4 Temperature Data Logger. By the end of 6 hours the air in the top of the freezer has warmed but no higher than -4C. I am surprised that it did so well given the age and condition of the seals.

I am confident that the new Danby will do much better!

Thanks for your interest.

George Plhak
Lions Head, Ontario, Canada

PS - Here is the EnerGuide label for my new freezer (Canada version). We will measure how well it does here.

Update July 21 - I changed the freezer July 13. Here is the daily usage reported by the outlet which runs the freezer. The vertical axis is kWh/day, the horizontal is the day of the month. It looks like the usage will be reduced by half with the new freezer!

INDEX to the series

Sunday, July 08, 2018

bird strike preventer


About using an old CD, some string, and 3 hook eyes to keep birds from hitting my big windows.

Extensively tested for the past three years.

If you try this, please let me know how it works for you.

Thanks for your interest.

George Plhak
Lions Head, Ontario, Canada

Wednesday, June 27, 2018

radon testing 2

You won't know you have a radon problem in your home unless you test for it. The test is easy to do and inexpensive.

Two radon tests recently done in my basement came back well within the allowable limit. The Canadian guideline for radon is 200 becquerels per cubic metre.

About 10% of Canadian homes are above this limit.

My results are 111 and 137 Bq/m³.


The reports (both from AccuStar) state that this test has an uncertainty of plus or minus 15%. I plan to repeat the test at some point.

I read somewhere that radon tests are required for real estate transactions in some US jurisdictions, but not yet in Canada.

radon testing - part one about how I did the test

Radon Responsible For 20% Of Grey Bruce Lung Cancer Deaths BlackburnNews.com (2017)
CBC report - High radon levels found in Health Canada tests across country (2014)
Radon Reduction Guide - Government of Canada (2013)


Thank you for your interest

George Plhak
Lions Head, Ontario, Canada

Wednesday, June 06, 2018

home electric progress 3

INDEX to the series

I have been monitoring my electricity usage and trying different reduction strategies which I've written about on this blog.

How am I doing?

This chart shows my total kWh usage (from my utility bill) for the month of May for the last five years.

[click any pic to enlarge]

Why May? It was last month :). Also I started this project May two years ago when I got the ability to read my smart meter data. You don't have to read your smart meter, but you can. And I had three years of prior history, so five Mays total.

My furnace burns oil and electricity. A major winter user, the furnace should be minimal in May. No A/C here. I can normalize for weather using heating degree days but I did not do that for this chart. I don't think it would make a big difference but I will check. The $ cost (below) really tells the story.

The kWh chart gives the impression of a cliff drop in usage two years ago but it wasn't like that. There was a whole year between the tall yellow bar (2016) and the green bar (2017). A whole year of trying stuff and changing things. Over the past two years I replaced two major appliances (water heater, then refrigerator) but also made many other smaller changes.

The kWh chart does not show my effort to use less peak priced power if possible. I actually used less DOLLARS since I used at different times, when rates were lower.

This DOLLAR chart shows my total bottom line bill electric cost for the same months. My month of May electric costs were rising until 2016 but have fallen for the past two years.

This shows me that my efforts to shift my "demand" to less expensive rates is working at the bottom line, even including all the "other charges" (delivery, debt repayment, tax, and the rebate/Ontario clean energy credit).

It does not cost much to shift time of use with timers. I use timers to shut off some appliances during peak billing periods: water heater, freezer, and even the refrigerator. Some appliances that we leave always on don't need to always be on. They can coast through six hours off even opening the doors a few times in the hottest weather if the seals are good. No food has spoiled here in two years. I always have hot water and well frozen food. It cost me about C$200 for the timers and energy monitors.

Your mileage may vary.

Thanks for your interest,

George Plhak
Lion's Head, Ontario, Canada

INDEX to the series

Thursday, May 31, 2018

refrigerator 6

INDEX to the series

Update on my refrigerator energy usage - NEW refrigerator uses less than half compared with the OLD refrigerator. [click the graph to enlarge]

Refrigerator numbers at the tops of the bars are measured total kWh per month.

As I wrote in refrigerator 5, the OLD refrigerator was in service until the end of October. The month of November usage is missing a week so that value is low.

Now that I have seven months of data for the NEW refrigerator I can be more confident of the data and the improvement.

If you don't measure, you don't know.

I measure my refrigerator electric usage using an inexpensive plug in energy monitor. I have been using several different models and will have an update with some observations shortly.

I continue to inhibit this appliance during peak energy cost periods.

Thanks for your interest,

George Plhak
Lion's Head, Ontario, Canada

INDEX to the series

Thursday, May 24, 2018

rain barrels

Rain barrels can save energy and support gardens. They should not cause house foundation flooding. [click any picture to enlarge]

This latest version is now in year two of service. A recent light rainfall of only 1 cm has filled both barrels from empty. I had drained them for the winter.

I have made two identical rain barrels, one for each end of a 21 foot section of seamless eaves trough newly mounted two years before. Highest in the middle each side curves gently downward. There is a downspout outlet near each end. Almost the entire top of the trough is covered with a mesh to keep leaves out. The mesh is sold in packages that give 20 linear feet and I'd have to buy another 20 feet to get the extra foot!

Ideally, both barrels should receive about the same amount of water from their half of the roof and minimal leaves.

The small platform raises each barrel from the existing cement pad so that a watering jug fits under the spout at the bottom (on the other side). All the water in the rain barrel can be used, right to the very bottom.

The straps attached to the house keep winter storms from moving the barrel.

The yellow rod sticking out of the top center of the barrel is the fill gauge. When the barrel is empty, as it has been all winter, the yellow rod only sticks up about 15 cm. Now when the barrel is full, the rod is almost as high as the barrel is tall.

The straight white pipe to the ground is both downspout and overflow. The main flow of water does not go directly into the barrel, as is typical. I've found that relying on overflow over the top edge of the barrel or a drain pipe (which is never as big as the inlet pipe) leads to flooding the area under the barrel when torrential rains fall.

Instead, there is a small "diverter" in the downspout near the top of the barrel. This diverter skims water from the downspout and directs it horizontally through a short length of hose into the top of the barrel, as long as the barrel is not full.

An important feature is that when the barrel is full, flow into the barrel automatically stops and ALL the water from the roof goes down the white pipe to the ground, away from the foundation.

A shallow trench helps water to drain away from the house.

The barrels I used were recycled from the food industry. Mine are from a chicken factory near Toronto. Many food manufacturers have these barrels as surplus and are happy to dispose of them. Mine cost $10 each and once contained soya sauce. I could tell this as they had the factory labels and a bit of dark soya in the bottom. Once washed, these barrels don't smell at all.

The diverter "Catch-A-Raindrop" is an interesting Made in Canada product sold by Home Depot for under C$20.

Here is a data sheet with some explanation.

The diverter fits like a coupler over and inside two sections of downspout. I cut the downspout to the recommended height, inserted the diverter and then added the section of downspout to the ground. A hinged angle coupling mates to the last section of downspout so that it can be lifted for grass trimming.

Here is a company video.

In spite of there being two sizes available from Amerimax, neither matched the downspout size I had so I had to create an adapter. That sits up top of the downspout, under the eaves trough. I have five different styles of gutter system on my old house (round, square, rectangular, plastic, aluminum ...)

From the diverter, a short length of garden hose directs the water into the barrel through a re-purposed electrical connector, making a neat installation.

Carlon "Carflex one piece liquidtight fitting" is intended for another purpose but works great as a 90 degree bulkhead fitting that seals to garden hose perfectly. These are about C$4 at Home Depot.

Here is a data sheet.

It is important to note that that you receive an Amerimax provided cap to seal off the diverter for the winter. You don't want water flowing into the barrel for the winter, so you disconnect the garden hose and cap the diverter. All the winter water runs to the ground with this simple change. I lost the caps so had to buy expensive new ones for the winter.

I was worried that winter ice might cause problems. The downspout was encased in a frozen cascade of ice but the diverter is undamaged.

The barrel tap is made up of a standard bronze plumbing valve with a threaded joint and a matching plastic "bulkhead fitting" available at a farm store. These come in many sizes. I used one inch which were about C$15 and the tap was about C$8. I could have used a plastic ball valve here.

For the holes, I used a hole saw in a drill. The barrel is HDPE 2 and is easily cut with regular wood tools.

The bulkhead fitting is reverse threaded so that it tightens in the counter clockwise direction. It also must be assembled with the sealing O Ring on the INSIDE of the barrel.

Because I needed access to the INSIDE of the barrel for the fittings and also because I wanted to be able to clean out the barrel easily, I cut out the tops of the barrels. I left a small lip around the rim of about 3cm which the lid can sit on.

I started by drilling a small hole in the center of the top. I then used a compass to scribe a circle on the top. The circle size was set by how close I could fit my jigsaw against the inside edge of the barrel lip. I wanted a lip but it turned out I got it by default.

The top of the barrel has two large fittings. My jigsaw would come close to, but would not cut between these fittings and the edge. To continue my cut around these fittings, I used a oscillating (or vibrating or multi) tool with a short straight saw cutter. It worked beautifully.

The bottom part of the picture shows the edge I achieved after a bit of effort with a wood rasp. The edge is smooth and safe.

This was my first attempt for a lid/top. The disk is waterproof plywood completely paint coated, including the inside of all the holes. Clearly I wasn't thinking about overflow at all!

Also, because there was a bit of a gap between the downspout and the lid, it was possible for mosquitoes to enter the barrel and lay their eggs in the water, which they did. When I removed the lid after a week, I could see the larva swimming.

A rain storm event caused catastrophic overflow right next to my house foundation. This is when I found the Catch-A-Raindrop and decided to include it.

The large square hole I had made in the lid could be used for a level gauge.

The level gauge is a plastic fishing float with the center push button removed, glued to the end of a fiber glass rod driveway marker.

The rod passes through a small brass cylinder glued into a wooden disk of the same painted waterproof plywood. The small brass rod is not really necessary. A hole drilled through the disk just slightly larger than the rod would do just fine.

The level gauge is a handy feature.

Finally the lid and the gauge are fastened with small stainless steel wood screws. Opening the lid is easy to check for debris and insects.

The Catch-A-Raindrop diverter prevents insect access to the barrel.

My total cost was about C$60 per barrel.


I am not meaning to pick on Home Hardware particularly but wanted to illustrate the cost of commercial product and to point out that this one does not seem to have any overflow protection? The water is poured in through the top mounted "insect screen". Where does water go when the barrel is full? Also wondering about the purpose of the two taps with one half way up the barrel? Also the water capacity is only 42 Gal rather than 55 Gal. Also, no recycling as when an otherwise surplus food barrel can be used.

rain barrels part 2

Thank you for your interest.

George Plhak
Lions Head, Ontario, Canada

Friday, February 23, 2018

sergiy yurko solar thermal concentrator

For some months I have been watching interesting YouTube videos from сергей юрко of Ukraine who, over the last two years, has built an impressively sized (58 sq. m of mirrors) east-west oriented concentrating solar trough heater.

Sergiy uses the array to provide heat for a home in winter and a swimming pool in summer in Mirgorod, Poltava region, Ukraine, about 50N latitude. In this video, he provides an English explanation of his steam demonstration.

In this video from about a year ago, he gives an overview. His previous videos are in Russian.

He uses strips of salvaged glass mirror attached to a clever stationary frame. Note the simple locking height adjusters that allow tilting the frame to match the seasons without using motorized tracking.

I was surprised and pleased to see his English videos as Sergiy Yurko. This is new. Sergiy is still adding to his Russian videos like this one from a week ago.

Note that he shows my work in his intro at 0:09-0:11!

Thanks for your interest.
George Plhak
Lions Head, Ontario, Canada