Sunday, December 28, 2014

your library has tools

I found that my local library has energy monitoring tools available to borrow. You should check at your own library.

I recently learned that it is possible to borrow a thermal imaging camera and other renewable energy tools from the Medicine Hat Public Library (see this from the Medicine Hat, AB HATSmart).

Other tools mentioned are an infrared thermometer, a power cost monitor and a watt meter. They are loaned like other library assets, handled with the normal system.

These are tools that the average homeowner might use if they were aware of how to properly use them to spot energy leaks. Some, like the thermal imaging camera, the average homeowner likely would not buy for their own use because of high cost. Rentals are not commonly available outside the "big city". Borrowing from the local library makes a lot of sense.

Were such tools available from my own library system?

I asked Erin at the local Lion's Head, ON library yesterday about borrowing renewable energy tools.

Erin showed me an electrical monitor which I borrowed to compare to my own (kill-a-watt). They have one of these Trickle-Star units in a kit with some useful publications at every branch through a program sponsored by Westario Power. Two Westerio publications "Energy Conservation Handbook" and "Energy Monitor Loaner Program" as well as the Trickle-Star user manual are included in the loaner kit.

Erin thinks they have one of the IR spot thermometers available.

Interestingly, she was not sure how to look these things up. On my library receipt, the call number for trickle-star is "BCPL energy monitor", the title is "Energy monitor loaner program". I have it for a week and will do some testing with it. You can reserve it through the BCPL on-line library.

My library also has a geocaching kit complete with GPS that you can borrow and there is some talk of buying a 3D printer!

The Medicine HAT Smart website has lots of useful information and is worth having a look.

I would be interested in what you find at your own library. Please use the comment form below.

I came across Medicine Hat while reading about the new Medicine Hat first concentrating solar power plant in Canada.


George Plhak
Lion's Head, Ontario, Canada

Your comments are always welcome. You can use the form below (comments are moderated and will appear a short time after you post - prevents spam)

Friday, October 24, 2014

weatherproof rotation switches from recycled thermostats

A good source for rotational switches can be had in old thermostats which contain a mercury switch or two.


An old thermostat contains a mercury switch which you can use to sense mechanical rotational position. This is especially valuable for outdoor projects since the switches are sealed. I am intending to use these for low voltage (about 12 volts) control where the switched current won't be more than an amp.

I am replacing 80s technology with recycled 90's tech. At my house, I have replaced the existing clock motor thermostat (the clock did not work) with a "new" (to me) Honeywell/34 that had been removed from a church. The date on the "new" manual is 1994. According to the manual: this thermostat is actually a small but powerful computer. So far it is working fine. The default temperature of 20C is a bit too warm but nice as I enjoy the heat while it is not too cool outside. The furnace is not working hard yet, the outside temp is about 5C. Replacing a thermostat is best done on a day when you don't actually need the heat.

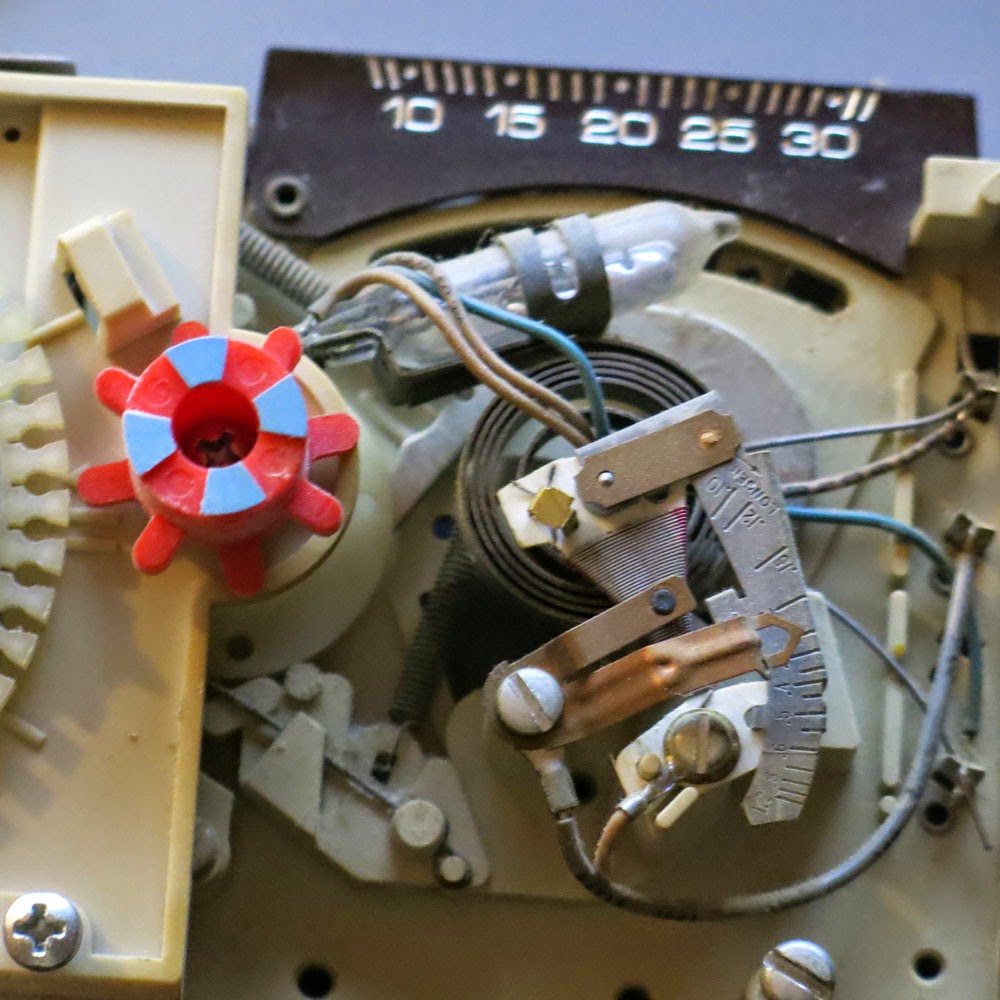
In this old Honeywell Chronotherm the single mercury switch is to the right on a tilt-able mount which is attached to the set temperature lever. The black thing with two wires hanging out the left side looks and feels like a battery. Is it possible that is a DC operated clock?

A closer view of the mercury switch, the small glass vial up and to the right to the right of the colored plastic post. I would like to remove the vial and it's wires without damage. I'll have to study it a bit and report back.

SAFETY REMINDER: Mercury is toxic and we must take a lot of care NOT TO BREAK THE VIAL and let the mercury escape. It is best to work over a pan so that should the vial be damaged, the mercury will escape into the pan. Keep a pill bottle handy for any escaped mercury metal.

In North America, you are more likely to see round Honeywell thermostats, like the T87 (complete data sheet here). It comes apart easily by undoing the single long screw that holds the adjustment post in place.

Recently, I rescued three T87 from a lighthouse that had new heating installed. Thank you Cabot Head. Three is ideal since if I have trouble with any one I will still have the two I need.

When I removed these from the wall, I did not know that there were three screws to remove the dome from its base so some damage resulted, mostly to a metal wiring terminal post but that won't matter for removal of the mercury switch.

Here is the T87 dis-assembled with the mercury switch on its thermal spring. The wire terminals are clean and undamaged. The drop of mercury is in the glass vial which is not chipped or cracked. With this one, the glass vial can be separated from the mounting clip, it just slides out the fingers, they haven't used any glue. But I think that we can make use of the clip assembly to mount our mercury switch.

Could we use the whole tilt-able mount assembly to have a fine adjustment built in to our own mount? For what I have in mind I don't want temperature to be a factor so I would like to replace all or most of the bi-metal spring which is the sensing element for temperature in this thermostat. Newer ones use a thermistor or a semiconductor sensing element and they don't contain a mercury switch.

One possible use of these type of switches is for limit switches in a solar tracking array or for a float switch.

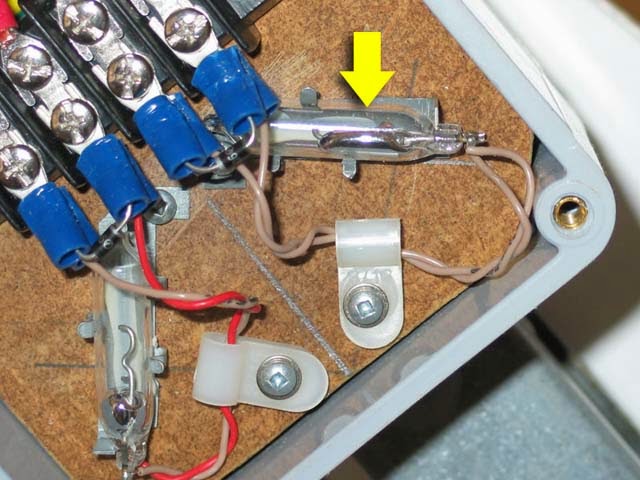
Mercury switches (in the box at the red arrow) are used to limit the rotation of the array in the pic of a parabolic solar collector.

Two mercury switches cut off motor current when the array tilts over as far as it should go. To go further will cause metal parts to jam together. Stalling the motor uses a lot of power uselessly so it is best to avoid hitting the mechanical limit. The mercury switches help prevent that.

It is not possible to easily buy mercury switches since they have all but been banned for new construction. However by gathering these as they are being removed from service saves them from the landfill and keeps them available for a future use.

Link here goes to the motor drive of the project. The main index is diy solar parabolic trough gen2 intro

George Plhak
Lion's Head, Ontario

Friday, July 11, 2014

solar bbq

This home built solar cooker is a parabolic solar reflector with a spit rod at the focus. A simple aligner post at the bottom front shows clearly when it is perfectly aimed at the sun. Aiming seems not that critical and the post makes it easy. We checked and moved very slightly only once during 1/2 hour of cooking.

Today was the first time I was able to try it. For my test, I cooked one hot dog to perfection. The test was done again the next day with four hot dogs. I would like to do a non-meat test.

Two things weren't perfect: I'd started cooking in the late afternoon, at about 4pm as the sun was already part way down the sky. Also, the reflective surface is not a mirror finish but shiny aluminum roofing flashing as it comes off the roll which might give I think about 1/2 performance, yet a useful test in itself. In spite of these two factors, I had a steaming hot dog (160F) in about a half an hour. I was hoping to be able to grill somewhat (brown the surface) but that didn't happen, it did not get hot enough. I will use a mirror film shortly and start cooking earlier in the day.

I can heat small objects which skewer onto the thin stainless rod which slides into a slot along the focal line. I used a round stainless rod but a square, flat, oval or triangular cross section might work better since the payload (what's on the spit/skewer) has a tendency to slide around on the round road as it cooks and shrinks.

The characteristics of the surface of what I put on the spit will determine how it heats. I thought that this might be useful for marshmallows but their bright white color makes it almost certain that they will reflect away most of the heat.

The aiming is manual. The small disk with a perpendicular dowel makes a sensitive indicator of the sun's position. If the shadow is small and falls almost directly near the dowel, the aim is good and the sun's concentration achieved is about 18 times.

click any picture to enlarge

Aiming disk. The shadow of the small dowel on the disk shows less than perfect alignment and gives an indication of which way the bbq should be turned in order to point more directly at the sun. In practice, the aiming is not super critical. If the shadow is within about 5cm of the dowel, this is good enough. We moved the trough only once in the half hour and probably didn't need to do that.

View of the rear. I am using a video camera tripod which makes an excellent mount. Not a polar mount but it gets the job done. I have attached a small plate with a captured nut the same as on the bottom of cameras (1/4-20) so I attach the bbq to the stand with one screw, the regular one used to attach a camera to the stand.

Trying again today with four dogs and starting mid-day. My assistant Justin is showing how bright it is standing close to the reflector. We have put a strip of aluminum foil over the bottom third (it is not very smooth) to see if it was more reflective than the aluminum roof flashing (if dogs heat quicker over the foil) and possibly to catch any drips.

One of the dogs after about 25 minutes. The glisten makes it difficult to measure the temperature with an optical temperature meter, there is scatter depending on how it was pointed. Done as before by removing the spit from the bbq and moving it to a shady area to measure.

It is hottest closest to the spit. It would not be effective, for example to thread the hot dogs onto the spit through their radial center as opposed to lengthwise, through their axial center even though it might seem to increase the capacity of the bbq (more hot dogs cooked at once?).
With the aluminum roll flashing as the reflector, I estimate about 200 watts of cooking power available. This could possibly reach 400 watts with a mirror reflector.

The finished product. Could be used also for kebabs or other long, narrow items.Temperatures as high as 160F to a low of about 70F so I don't have faith in the measurement. The dogs were warm to the touch and mouth though and already cooked (according to the package). I would still like to broil them so need to get mirror material for the reflector.

Still, I am encouraged to see that this works. If you only had access to roof flashing and a bit of plywood, some straight angle metal (aluminum, steel, plastic, fiberglass etc), a workable spit bbq can be achieved at very low cost. The cost of the materials as I did it (not including the tripod) is about Cdn$10-$25. Using flexible mirror in place of the roof flashing might double cost but improve performance, probably near double (will cook faster and hotter).

This is an example of what can be done with the gen2 design in a simplified version. The gen2 book is available here in either downloadable or paper version.