Wednesday, August 28, 2019

battery testing

Some of my lithium rechargeable cells weren't lasting as long as others.

Sorting my batteries was made easier with a simple inexpensive battery capacity tester.


I found a wide variation in my own assortment of various 18650 Li-Ion cells. Now each cell has a number, the milliampere-hours (mAh) the battery achieved on the tester.

[click any pic to enlarge]

The one pictured had been running on the tester for over an hour. At the time of the picture, that 2600mAh battery had achieved 1716mAh (the display shows amp-hours ie 1.716 Ah). The final capacity is determined automatically by the tester when the battery voltage falls below 3 volts, the test is stopped and the final Ah shows flashing on the display. For this battery, the final was 2.758 Ah (2758 mAh).

This one battery is my BEST battery and the ONLY one that achieved a result on my tester greater than what was branded. None of the rest achieved branded capacity out of 15 cells tested. Bought from various sources, my 18650's cost me between C$7 to $15 each.

The better ones are going to be used more often in my flashlights and USB power packs. The weak ones are going to help guide my purchasing decisions after they go to electronics re-cycling.

I am using the ZHIYU ZB2L3. Mine came from Banggood product ID: 1112859 in a little over a week after I ordered. The units I received were v2.3a.

ZB2L3 is a small circuit board which discharges a test battery into a resistor while measuring battery voltage and the current delivered to the resistor. ZB2L3 calculates the mAh. While testing, the display cycles three numbers and an LED at the side of the display shows alternately amp-hours, amps and volts. You can see a video here.

The micro USB cable only supplies 5 volts to the ZB2L3, not data. Since this is a complete discharge test, the ZB2L3 must have an alternate source of power hence the USB connection. Almost no energy is drawn from the USB. You can plug it into any USB charger or port. It will not charge the battery.

There is no data analysis available from the ZB2L3 other than from the display. I'd love to know that there was a way to capture a discharge curve such as this one, to explore different discharge rates and temperatures.

Two power resistors came with my ZB2L3. I used only one for all of this first round of tests. By using one of the supplied 7.5 ohm 5 watt resistors, the battery at 3.7 volts was seeing about a half amp of draw. This is (3.7X0.5=) 1.8 watts which makes the little square 5 watt resistor very hot, too hot to touch. That is why I have a cardboard sheet under the test, to protect the desktop. In hindsight it should have been a fire-proof insulating sheet. The battery gets slightly warm as it's working pretty hard.

I got the 18650 size battery holders from Banggood also. These I won't recommend. Although the battery should be held firmly against the contacts, with these battery holders it is difficult to remove the battery. The wires are very flimsy and probably contribute some voltage drop to the battery voltage measurement. Wires to the battery should as short as possible and a larger gauge wire. The contacts in this holder probably wouldn't handle soldering well. I will order better holders.

This test is a vivid demonstration of how much energy is stored in these little cells. The resistor is too hot to touch for several hours.

The ZB2L3 can be used for a range of batteries up to 12 volts and measures up to 9999 Ah. The value of the resistor can be adjusted to change the discharge rate up to 3 amps maximum but you must keep safety in mind of course.

Thanks for your interest,

George Plhak
Lions Head, Ontario, Canada

These cells, branded Ultrafire 6800 mAh show that the test gives consistent results on one type although the value is way lower than the branded capacity?!

The battery flipped over to show the branded capacity tested at only 795 mAh, the lowest of this batch of "6800 mAh" batteries.


As is my custom, this is not a paid review nor do I receive or solicit any product in return for writing. I am not selling these products. Just ideas. I don't get a commission. I don't show ads. I don't have a fundraising or patreon page.
I write in the hope that this is interesting or useful to you.
If you would like to show support for my independent work,
please consider commenting or buying one of my books? Thank you. George

Tuesday, July 02, 2019

improving cell data with a refrigerator

I have been experimenting with my cell phone as the hot spot for my home internet. The pic is my Rogers cell based internet after placing my phone in the best location which I discovered here yesterday, on a box on top of my fridge.

Rogers is offering an unlimited data plan which was a $5/mo upgrade so I took it. I intend to drop my land line based internet to save by having cell only.


My current ADSL (phone line based) internet is the least expensive plan from the only landline provider in my area, Eastlink. I enjoy slow but solid internet, 5 Mbps download, 1 Mbps upload, unlimited for $75/mo. Rogers will now cost me $80/month for their cheapest wireless unlimited plan. (see their website and the pic above)

Before yesterday, my Rogers cell data and reception were not good inside the house. And highly variable, from un-usable to outstanding. Today, reception has not changed except that I found the best location from which to access my available signal. I am pleased with what I found but there are a couple of caveats (read on).

Where I live has two negatives for cell data. My house is low in elevation relative to the two area cell towers so much of the cell signal is blocked by surrounding hills. Second, my house is covered with a metal mesh based cement that effectively shields electromagnetic radiation, like cell signals. Two negatives.

I looked at 4G cell repeaters/boosters. Hundreds of dollars and not all work with Rogers. I haven't tried one yet.

I learned about cellular booster reflectors from old satellite dishes.

Instead, I loaded an app to measure cell signal strength. I am using Network Cell Info Lite. This one is for Android.

The gauge display shows main and next best cell signal strength in dBm. The gauge updates every second or so.

Most people don't think much about where they put down their phone. Maybe you carry yours? Our phones are marvelous little radios which are sensitive to orientation and surroundings! Especially when we need them to work their best.

I have been exploring my house for my BEST signal. Signal inside my house varies over a huge range from -100dBm to -125dBm. The dBm scale is logarithmic. Lower numbers in this case are hugely better.

I can see that I am using band 12. This changes sometimes to band 4. Both of these are 800-900 Mhz. In rural areas like mine, lower frequencies like these will travel further and have adequate data rates to impress me when working well!

I don't get to pick a tower or frequency. Those are selected auto-magically between my phone and my provider.

I can see LTE on the display. This might mean 4G but it's complicated in Canada.

Yesterday I drove to the two towers that serve my area. look up your local cell towers, operators and frequencies Each is about 6 km distant, one is to the north and one is south. Using my app phone signal strength meter I measured the signal about 1 km from the towers at about -60dBm! But nobody lives there, well not many anyway...

By clicking once on a tower in the map, I learn that at the northern tower, Rogers uses 700MHz, 850 MHz and 1900MHz, Bell uses 700 and 850. At the southern tower, Rogers uses only 700 and 850. Bell is not on the southern tower. More specific information on all of the cell transceivers at a tower comes up in a table if you double click on that tower.

Back at my house, quite by accident, I found TWO spots where the signal is best. Both are on top of large grounded metal objects: my refrigerator and my clothes dryer. The metal case of both appliances is attached through their electrical cords to earth ground.

With my phone flat directly on top center of either the fridge or the dryer, my signal strength is the best inside my house. The fridge is slightly better at -97dBm.

When I check download data rate using speedtest.net from either of those spots, it is noticeably higher (twice as high!) than most anywhere else in the house!

But Upload data rate is much worse when the phone is placed directly on top of these large metal objects! It slows to less than 1 Mbps. But - if I lift the phone up about 5 inches high and place it on an empty cardboard box (about 1/4 wavelength, my phone is using 850MHz) the download data is still good and the upload data improves enormously!

Is it possible that the appliances are making a ground plane for the phone, helping with receive and transmit?

I tried different height boxes (two, three, five and eight) and the five inch seemed to be best.

I tried changing the phone's orientation, on either side, on the ends, rotating it slowly in different planes while holding it approximately 5 inches above the fridge and trying to watch the display. But placed down flat on the phone's back on the 5 inch box seemed the best (lowest) dBm reading. Minor changes if rotated slightly and slowly on the box.

I tried putting the phone over a large un-grounded metal plate on the kitchen table, with and without the 5" cardboard spacer box. The metal plate made no difference.

I rarely use my phone for voice so parking it on top of a box on the fridge is no problem for me. I can hear it ring anywhere in the house.

When I go out, the phone comes with me so the home network stops. I don't have any "smart home" devices that need always internet so this is not a problem.

If there were two phones in the house, one could set up sharing of two cell links with two hot spots (with bridging?) to further improve data rate?

If you try this, please let me know.

This experience has caused me to clean the top of the fridge. It was pretty dirty up there but cleaning had no effect on the signal strength.

Thanks for your interest.

George Plhak
Lions Head, Ontario, Canada

Update Jul 22 2019 Eastlink has been OFF since I wrote this and I have been accessing the web with Rogers cell only. I frankly haven't noticed the change, except for generally better responsiveness (plus!) and having to retrieve my cell phone off the fridge when I go out and then putting it back (negative). The actual internet data service is far superior to what I was getting with Eastlink (5mbs down 1 mps up) as this speedtest just now shows. I was worried about the throttling back "feature" but that does not seem to have happened yet. I get my latest full Rogers bill with usage and dollars on the new plan tomorrow.

Monday, June 24, 2019

hot wire foam cutter

I built a simple hot wire foam cutter to make parts for a couple of projects.

I wanted to slit a full sheet of 1.5 inch insulating foam into strips for a mooney wall. Another project, a water heater insulator, required large foam discs.

What started as quick and dirty ended up a very useful tool.


Using scrap wood, I began by adding a slot and a "fence" to a partial sheet of particleboard to make the table. The board was what I had, about 3 foot by six foot supported on two saw horses. I added a strip of wood lengthwise opposite the fence to support the front edge. The table is hung on the wall when not in use. [click any pic to enlarge]

Using particle board was problematic. When fed across the table, large pieces of foam would catch on the tiny sharp fibers sticking out of the particleboard. I later sanded and painted the top surface with several coats of latex paint which helped. It would have been better to use a smoother surfaced board.

The cutter arm is U shaped to support the cutter wire and slides in a groove under the table to adjust. It is then fixed in place for the cut.

I thought to make a variation with the hot wire slide-able to make cross cuts but haven't done that yet.

The slotted hole in the table is for the hot wire. I didn't want to cut through the fence on the back of the table. There is a minimum width that the wire can be set to, about 6 inches and a maximum of about 18 inches. The width of the slots for the mooney wall are 14.5 inches so this is a good amount of adjustment. Varying the dimensions could give other capacities.

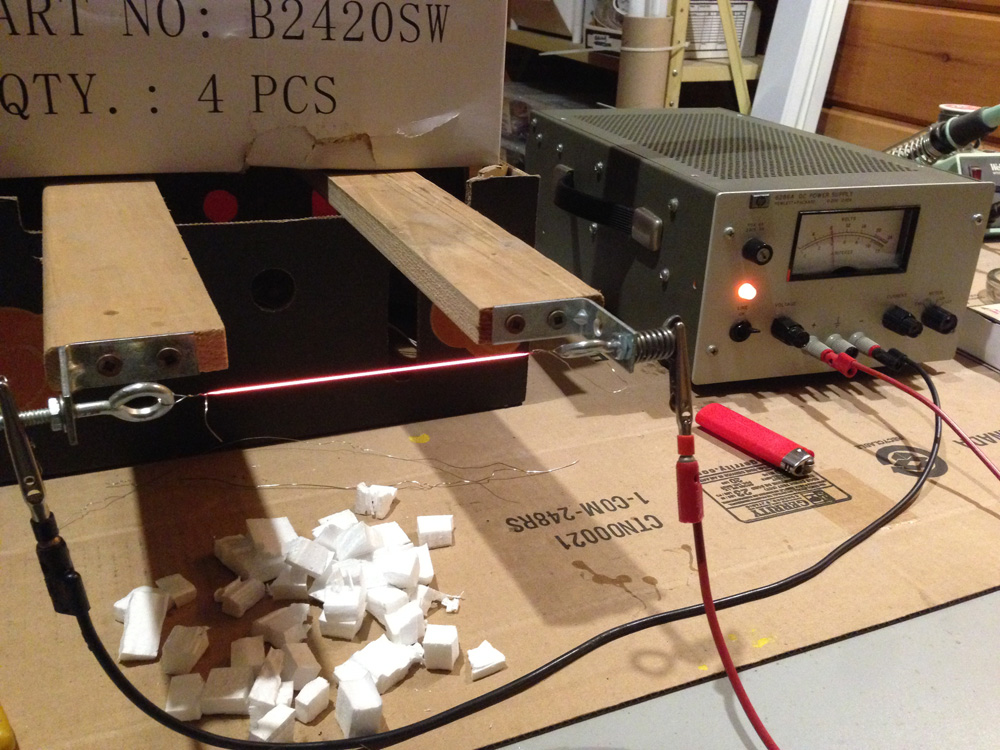
The hot wire on the bench with power supply testing cutting action!

It turns out that the wire does not need to be red hot as shown, but just slightly less, sort of a dull red. I have an adjustable DC supply giving the wire about 4 amps at 8 volts. The voltage and current will depend on the wire type, gauge, length and the desired temperature so the adjustable lab supply is a good fit for a hot wire cutter. Normally the supply sits under the table and is connected to the two ends of the hot wire with test leads.

The wire I am using is heater wire (nichrome), typically used in toaster ovens. The first samples of wire I used were harvested from an old appliance. Later I found that I could easily buy small amounts of nichrome wire on Ebay from China so ordered 0.3, 0.4 and 0.5 mm coils.

I found that 0.4mm nichrome gave good cutting life and resistance to breaking. Getting the right temperature and the feed rate requires a bit of experimentation.

Nichrome wire expands when heated, as much as 5%, so there is a spring in the mount to put the wire under tension. When at the operating temperature, there should still be a bit of tension from the spring to get a straight cut.

The wire is simply looped through the eye bolt and wound around itself a few turns. The nuts on the eye bolts are adjusted to put the wire under tension. Normally I form, adjust and test the wire on the bench out in the open, then remove it from the arm, mount the arm on the table and then remount the wire through the slot in the table. It's easier.

Shows the smooth cut on blue type styrofoam. The edge obtained is very smooth.

Cutting foam discs with a pin through the center into the table as a pivot.

Using a thin template to guide the wire to produce a cutout in one of the discs.

Again using a template to make cutouts in one of the discs which has been already cut in half with the wire.

One of the many eight foot by 14.5 inch slabs for the mooney wall that was cut with the wire cutter.


Thanks for your interest.

George Plhak
Lions Head, Ontario, Canada

Detail under the table showing the mount for the arm made from scrap wood. The arm (with the wire removed) is inserted in a slot from the back and fixed in place with the screws that protrude to the right. Crude but adequate.