Rain barrels can save energy and support gardens. They should not cause house foundation flooding. [click any picture to enlarge]
This latest version is now in year two of service. A recent light rainfall of only 1 cm has filled both barrels from empty. I had drained them for the winter.
I have made two identical rain barrels, one for each end of a 21 foot section of seamless eaves trough newly mounted two years before. Highest in the middle each side curves gently downward. There is a downspout outlet near each end. Almost the entire top of the trough is covered with a mesh to keep leaves out. The mesh is sold in packages that give 20 linear feet and I'd have to buy another 20 feet to get the extra foot!
Ideally, both barrels should receive about the same amount of water from their half of the roof and minimal leaves.
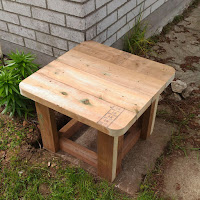
The small platform raises each barrel from the existing cement pad so that a watering jug fits under the spout at the bottom (on the other side). All the water in the rain barrel can be used, right to the very bottom.
The straps attached to the house keep winter storms from moving the barrel.
The yellow rod sticking out of the top center of the barrel is the fill gauge. When the barrel is empty, as it has been all winter, the yellow rod only sticks up about 15 cm. Now when the barrel is full, the rod is almost as high as the barrel is tall.
The straight white pipe to the ground is both downspout and overflow. The main flow of water does not go directly into the barrel, as is typical. I've found that relying on overflow over the top edge of the barrel or a drain pipe (which is never as big as the inlet pipe) leads to flooding the area under the barrel when torrential rains fall.
Instead, there is a small "diverter" in the downspout near the top of the barrel. This diverter skims water from the downspout and directs it horizontally through a short length of hose into the top of the barrel, as long as the barrel is not full.
An important feature is that when the barrel is full, flow into the barrel automatically stops and ALL the water from the roof goes down the white pipe to the ground, away from the foundation.
A shallow trench helps water to drain away from the house.
The barrels I used were recycled from the food industry. Mine are from a chicken factory near Toronto. Many food manufacturers have these barrels as surplus and are happy to dispose of them. Mine cost $10 each and once contained soya sauce. I could tell this as they had the factory labels and a bit of dark soya in the bottom. Once washed, these barrels don't smell at all.
The diverter "Catch-A-Raindrop" is an interesting Made in Canada product sold by Home Depot for under C$20.
Here is a data sheet with some explanation.
The diverter fits like a coupler over and inside two sections of downspout. I cut the downspout to the recommended height, inserted the diverter and then added the section of downspout to the ground. A hinged angle coupling mates to the last section of downspout so that it can be lifted for grass trimming.
Here is a company video.
In spite of there being two sizes available from Amerimax, neither matched the downspout size I had so I had to create an adapter. That sits up top of the downspout, under the eaves trough. I have five different styles of gutter system on my old house (round, square, rectangular, plastic, aluminum ...)
From the diverter, a short length of garden hose directs the water into the barrel through a re-purposed electrical connector, making a neat installation.
Carlon "Carflex one piece liquidtight fitting" is intended for another purpose but works great as a 90 degree bulkhead fitting that seals to garden hose perfectly. These are about C$4 at Home Depot.
Here is a data sheet.
It is important to note that that you receive an Amerimax provided cap to seal off the diverter for the winter. You don't want water flowing into the barrel for the winter, so you disconnect the garden hose and cap the diverter. All the winter water runs to the ground with this simple change. I lost the caps so had to buy expensive new ones for the winter.
I was worried that winter ice might cause problems. The downspout was encased in a frozen cascade of ice but the diverter is undamaged.
The barrel tap is made up of a standard bronze plumbing valve with a threaded joint and a matching plastic "bulkhead fitting" available at a farm store. These come in many sizes. I used one inch which were about C$15 and the tap was about C$8. I could have used a plastic ball valve here.
For the holes, I used a hole saw in a drill. The barrel is HDPE 2 and is easily cut with regular wood tools.
The bulkhead fitting is reverse threaded so that it tightens in the counter clockwise direction. It also must be assembled with the sealing O Ring on the INSIDE of the barrel.
Because I needed access to the INSIDE of the barrel for the fittings and also because I wanted to be able to clean out the barrel easily, I cut out the tops of the barrels. I left a small lip around the rim of about 3cm which the lid can sit on.
I started by drilling a small hole in the center of the top. I then used a compass to scribe a circle on the top. The circle size was set by how close I could fit my jigsaw against the inside edge of the barrel lip. I wanted a lip but it turned out I got it by default.
The top of the barrel has two large fittings. My jigsaw would come close to, but would not cut between these fittings and the edge. To continue my cut around these fittings, I used a oscillating (or vibrating or multi) tool with a short straight saw cutter. It worked beautifully.
The bottom part of the picture shows the edge I achieved after a bit of effort with a wood rasp. The edge is smooth and safe.
This was my first attempt for a lid/top. The disk is waterproof plywood completely paint coated, including the inside of all the holes. Clearly I wasn't thinking about overflow at all!
Also, because there was a bit of a gap between the downspout and the lid, it was possible for mosquitoes to enter the barrel and lay their eggs in the water, which they did. When I removed the lid after a week, I could see the larva swimming.
A rain storm event caused catastrophic overflow right next to my house foundation. This is when I found the Catch-A-Raindrop and decided to include it.
The large square hole I had made in the lid could be used for a level gauge.
The level gauge is a plastic fishing float with the center push button removed, glued to the end of a fiber glass rod driveway marker.
The rod passes through a small brass cylinder glued into a wooden disk of the same painted waterproof plywood. The small brass rod is not really necessary. A hole drilled through the disk just slightly larger than the rod would do just fine.
The level gauge is a handy feature.
Finally the lid and the gauge are fastened with small stainless steel wood screws. Opening the lid is easy to check for debris and insects.
The Catch-A-Raindrop diverter prevents insect access to the barrel.
My total cost was about C$60 per barrel.

I am not meaning to pick on Home Hardware particularly but wanted to illustrate the cost of commercial product and to point out that this one does not seem to have any overflow protection? The water is poured in through the top mounted "insect screen". Where does water go when the barrel is full? Also wondering about the purpose of the two taps with one half way up the barrel? Also the water capacity is only 42 Gal rather than 55 Gal. Also, no recycling as when an otherwise surplus food barrel can be used.
rain barrels part 2
Thank you for your interest.
George Plhak
Lions Head, Ontario, Canada