Showing posts with label reuse. Show all posts

Wednesday, August 11, 2021

polishing headlights

Improving 14 year old headlights for about $25 and a few hours easy work. 

Most of the time is to allow drying after each step.

I used 1000, 2000 then 3000 grit 2 inch sanding disks in a drill to wet sand, followed by hand sanding then washing and drying at each step. Then I put on gloves and applied Wipe-New.

I had not used Wipe-New" before. The result is impressive.

The "AFTER" picture
<click to enlarge>


The "BEFORE" picture

The headlight as it was with masking tape applied to the surrounding paint.

Hard to believe it was this bad.

Three steps of progressively finer sanding disks were used wet followed by cleaning and drying after each.

Machine sanding with the drill was followed with hand sanding with the same grade pad at each step.

New sanding disks were used for each headlamp at each step.


Wipe-New back of package

Contains:
tert-butyl acetate,
1-choro-4-(trifloromethyl)
benzene and benzaldehyde.
Wear gloves.
Use outside.

Have both headlights prepared before you open this package. It evaporates very quickly.
Wipe each headlight only once to coat the surface.
I went in horizontal strips.
The applicator works well.
Do not try to touch up.
Wait for an hour.


Wipe-New package

Wipe-New product link

I bought at Canadian Tire for about C$20 +tax


    The live action "TECHNIQUE" video
 
The final result.

I am very pleased!

I will see better in the dark and will not confuse on-coming drivers.
Thanks for your interest.

George Plhak
Lions Head, Ontario, Canada


Tuesday, June 22, 2021

fixing old stuff

Troubleshooting two big old Tektronix 7854 in my garage. The first analog oscilloscope with a computer. An oscilloscope lets you "see" electricity.
 
Currently I am checking the LV power supplies. I think I can operate them completely out of the scope.
 
I hope it will be an advantage to be able to compare one scope to the other. I have already found a few things
 
I have the 3" thick paper Tek manual with beautiful foldout diagrams and all the update pages (late issue).
 
And I have a third working 7854 on a cart in the house. I can always open that one up too :)
 
Why do this?
 
These scopes might be forty years old. A modern $400 oscilloscope from China does more, better, smaller, lighter, and is way cheaper (but probably not with 400MHz bandwidth).
 
The 7854 was introduced in 1981 at a base cost of US$10,500. In my 1987 Tek catalog it lists for $16,220 but by then included the waveform calculator and the extra memory option. Project Leader on this scope was Tom Rousseau. More about Tom and the 7A26 amplifier.
 
 
Thanks for your interest.
 
George Plhak
Lions Head, Ontario, Canada


Friday, September 27, 2019

battery testing 2

Using the small automatic tester to check car sized batteries takes much longer but gives useful sorting information.

Continuing with the theme of battery testing but on a different scale, I have changed the loading of the battery tester to draw more current. The three large resistors are in series across the load terminals of the tester. The resistors are the three rectangles with my handwriting on them.

[click any pic to enlarge]

The handwriting is the measured resistance in ohms. Since the resistors are in series, the three total 15.7 ohms. Each are rated at 22 watts so the three theoretically could dissipate over 60 watts. With only 12 watts used in this test, the resistors get very hot, too hot to touch, hot enough to boil water. The metal screen helps to cool them.

I would first charge the battery fully with a separate charger and let it rest overnight. A good battery would measure in the range of 12.4 to 12.8 volts. The tester was then set to discharge the battery to 11 volts and the test started.

The tester checks the battery voltage and offers to start with a default of 10.5 volts but I did not want to discharge the batteries that low.

With a freshly charged battery the current drawn at the start of the test is about 850 milliamps (0.85 amp), or about 12 watts. This is a modest rate for a car battery. The tester is specd at a maximum current of 3 amps so this is well within its range. A load of 12 watts might simulate one charging cell phone for example or a bright LED light.

The test takes some time. I managed to check four batteries in the past couple weeks including an almost dead battery that was then returned for recycling.

I expected this battery to test weak. It had been removed from my car three years ago. It would start the car ok in the summer but was not reliable in the winter. This particular battery had continued in service here in a small solar UPS in the shop and true to form, it would last only one night in the dead of winter powering a 12 watt LED overnight. If it was cloudy the next day, the LED would not last till morning.

This battery took almost 14 hours to discharge to 11 volts and gave a result of 10.3 amp hours. I charged it again, repeated the discharge test and got 10.7. So there was some indication of repeatability to the test.

The new battery I purchased (the one in the first picture) is now installed in my car. As expected, the factory fresh battery scored well at 54.5 amp hours. It took three days to discharge!

So I now had a range for good to bad.

Continuing with three other lead acid batteries, I managed to get clear, unambiguous ratings of the battery capacities, all at the same rate.

The "old" battery that I just just removed from my car will now go to the UPS. It tested 37.2 AH.

Video is here.

Thanks for your interest.

George Plhak
Lions Head, Ontario, Canada

[update Oct 6] Great comment from Len Warner:
This is very sensible testing but one should not deep discharge automotive batteries unless there is a real need to know. However, all this seems valid: new battery tested to establish a reference; replaced car battery tested to qualify it for ups; and old ups battery tested to confirm it's ready to scrap. But the other two tests have cost you a cycle life.
Another test you haven't done is charge retention: ancient automotive batteries tend to have lost plate material, which accumulates at the bottom of each cell and shorts it out so the battery won't hold its charge long-term. It also tends to affect cells unequally, leading to cell imbalance and overcharging.
Traction batteries and leisure batteries should be more resistant to deep-cycling because of stronger plates and sumps for debris.

Tuesday, September 03, 2019

digital clock


Some additional detail. A short photo essay to expand on the above FB post. [the FB link does not seem to be fully live. Try this instead]

The circuit working on my bench yesterday. Link to the video. It keeps time from the 60Hz line frequency so it is pretty accurate unless the power goes off in which case it needs to be reset. It doesn't know about daylight savings time. It does not dim at night. It's big and heavy. But still pretty cool to watch.

In the very early 70s, while a student at UofToronto, I found giant neon nixie tubes at a surplus shop in the electronics market then around Yonge and Wellesley.

I was told those tubes came from the stock market display board at the TSE (now the TSX). The display tubes for this vital board were changed regularly and these were the rejects. I think they were expensive, maybe $5 each?. I was a student so couldn't afford new ones then. In the 80s, I replaced those tubes with these real NEW ones that were still available then, about $30 each. Advertised on EBay now for US$200 each for USED ones.

Digital clocks were a very hot item then and there just weren't any BIG Digital Grandfather Clocks, so I decided to build one. Because of the used tubes, this is a reuse project!

The presentation needed to be impressive so I enlisted the help of a friend who was a better woodworker. He helped me with the cabinets made from mahogany (which you could buy then) and a huge sheet of 1/4 inch smoked plexiglass. Until yesterday this clock was almost six feet tall and very heavy and awkward. It was not very stable on a floor but it never fell over! It did not have levelers at the bottom so needed shims to be vertical on a old slanted floor.

I had moved this clock wherever I went for the past 45 years. I moved it maybe ten times. It was coming apart at the bottom and needed to be fixed.

The big space under the clock was intended to house an electronic pendulum which never got built. Nor the electronic chimes. So there was really not the need for the big space. Yesterday I shortened the cabinet and made some repairs and improvements. Now it fits on a desktop or shelf.

Built with six fancy Burroughs special 17 pin sockets, hand wired and supported with a piece of wood.

The bottom of the clock board.

Mains power supply. The nixie tubes need 180 volts. The rest of the circuit used low voltage. This made both. I cannot believe it worked for 45 years!

The board layout.

Then in 1976 Heathkit introduced a digital floor clock GC-1195 and digital shelf clock GC-1197. The first commercially available digital "grandfather" clock. Popular but not a huge success.

Their display used wedge based incandescent lamps that burned out frequently. Heathkit offered a Winchester chimes option. No pendulum.


I got busy with school and never made another clock.

Thanks for your interest

George Plhak
Lions Head, Ontario, Canada


Wednesday, May 29, 2019

rain barrels 2

Barrel equalization with a siphon bridge and flood control continued

rain barrels part 1


Lessons learned: This is a former rain barrel setup where I had re-used three food grade barrels on a raised platform behind a pool shed/pump house. The location was ideal, steps away from a large (5m x 10m) vegetable garden. The edge of my solar pool heater array can be seen at left back.

Using only rain water my three barrels were adequate to spot-water my garden over several hot summers without diverting the pool waste water. I used a watering can, not a hose. Better exercise and water control.

The two downspouts delivered all the rain water from the shed roof into the outer barrels.

I considered diverting some of the waste water from cleaning the pool sand filter (the single white pipe lower right) into the barrels. The high flow rate of the waste water made it difficult. I had once measured the flow rate as 37 gallons per minute. There was no "low" setting for the pump and 50000 gallons of water available in the pool. Better to just let it blast out into the seasonal stream. The wastewater pipe extended about 5 meters from the shed toward the stream.

So diversion of the pool waste water was not really required. But some of the details of that system could have been improved.

Covers on the barrels prevented insects from entering and laying eggs (like mosquitoes). Some designs have a screen at the top of the barrel. Any debris from the roof would have to be cleared regularly from this screen. That sounded like a bad idea.

Here, rainfall via the downspouts dropped straight into the barrels through tight seals in the covers, keeping insects out. But was not a good idea for a couple of reasons.

Any debris from the roof went directly into the barrels. By the end of the season, there was a thick bed in the bottom of the outer barrels, enough to clog the equalizer hoses.

There was no provision for overflow. During torrential rain a small lake would form at the back of the pool shed from the water that overflowed the barrels. Next to the house this might cause water to enter the basement or saturate the foundation. But behind the pool shed this wasn't a serious problem.

The single tap was on the center barrel. I had used a fancy and expensive bulkhead valve from Lee Valley Tools, so there was only one tap from which to draw water from three barrels.

I needed a way for the water to flow between the barrels, as new water was added to the outside or as I took water from the center tap. You can see my solution in this picture [click any pic to enlarge]. I used Carlon electrical fittings and short lengths of garden hose to connect the three barrels at about the same level as the tap. The tap height establishes the lowest level that the water can be in the barrels so the equalizing hose should be at the same level so all three tanks drain equally.

If the equalizer hoses or the tap are up on the barrel somewhere, not at the bottom, you won't be making full use of your barrel capacity.

A barrel should be raised off the ground, at least as high as the top of your watering can, or higher.

Back to here and now: I have re-arranged my two 55 gal re-cycled food grade barrels to be at one end of the roof rather than one at each end. I want to do some work on the other end of the wall so that barrel had to be moved. I have adjusted the trough on the roof edge to slope downward to this corner rather than down from the center so all the water now flows to this corner.

I have a single diverter (at the green arrow - the Canadian made "Catch-A-Raindrop" described in part 1) in the downspout to the ground and a single fill pipe to the left barrel. The downspout sends overflow into a drainage ditch to get the water further from the foundation. The diverter will not send water into the barrel when it is full. Leaves and debris from the roof continue to the ditch. It works great!

But it only feeds one barrel while maintaining auto shutoff to prevent overflow.

I needed a way to equalize the level in two barrels. I could have used the same arrangement as I did above but instead I decided to try a siphon bridge.

My siphon bridge is a length of hose which reaches the bottoms of both barrels. Primed with water (no air inside) the siphon bridge will allow water to flow from the barrel with higher water level into the barrel less full. I am using PEX.

Here I am demonstrating to myself that the concept does indeed work. The right barrel had been about a foot lower in level. After about 1/2 hour, the two barrels equalized.

The siphon bridge was attractive because I didn't have to put any new holes in the barrels. I had already emptied, cleaned and refilled them. To accommodate the siphon bridge needed two pipe sized holes drilled in the barrel lids.

The final configuration with both barrels full and ready. The blue arrow shows the siphon bridge in place. The yellow arrows show the tips of the water level gauges.

Note that insects have no way to enter the water. The tops of the barrels are essentially sealed although some air can enter as water leaves the barrels.

I suppose the siphon bridge could be used to connect three or more barrels.

Although simple, the siphon bridge needs to be primed. This means sucking the air out. I used my mouth on one end, holding the other end deep in one barrel. I held it low to the ground to ensure that water was flowing at a good clip and then closed the end with my thumb and stuck it underwater in the other barrel.

It was necessary to have the PEX already inserted through the covers so they could be screwed down once the siphon was primed.

The siphon bridge has the disadvantage that it needs priming and it might again if it looses prime. The horizontal tube at the bottom approach does not require priming but it is more complex and needs more holes in the barrels.

rain barrels part 1

Interesting video of siphon bridge used between two raft beds.

Thanks for your interest.

George Plhak
Lions Head, Ontario, Canada

As before, not wanting to pick on Home Hardware. This is a current example of a popular rain barrel product with an insect screen at the top. Roof debris would clog this filter unless cleaned regularly. No overflow consideration. With tap at the bottom of the barrel you'd get more water out if the barrel was raised off the ground, at least as high as the watering can filler. Not sure how you would cascade two or more of these if you wanted more capacity.

Monday, April 15, 2019

series parallel

I wondered about the recent web traffic here from MIT (Massachusetts Institute of Technology).

I visited the referring link and found some of my work at MIT Circuits and Electronics Spring 2019 Lab 9 (scroll down to "The Challenge"), illustrated with one of my diagrams and a concept from my piece on fixing LED string lights.

I am honored. Welcome MIT students.

The MIT labs are pretty cool. There is recommended music! For Lab 9 "Tesla - Modern Day Cowboy"

I had illustrated a concept with actual data as a waveform on a 40 year old Tektronix storage oscilloscope, something that today's students will probably never see. Likely why the MIT author turned that into a graph. The MIT function generator has menus, mine has knobs.

But the physics remains the same.

Thanks for your interest!

George Plhak
Lions Head, Ontario, Canada

Tuesday, September 18, 2018

handy totes from produce trays

Why buy plastic organizers? You can get free corrugated fiberboard organizers at your food store.

If you have access to your grocery's packaging discards, you might experiment with produce trays.


Produce trays which carry fresh fruit and vegetables can be very sturdy. Some are even waterproof. Some have interlocking tabs to help them to stack. Some are beautifully made and very durable. They come in a variety of sizes.

I am finding them very handy for organizing my stuff.

They are free. They need recycling but reuse is even better!

I glued and screwed scrap 1x2 pine to the short ends to act as reinforcing handles. You could add these instead on the long sides? You can paint the trays (the ones without the glossy coating).

Some have holes in the bottom so another sheet of cardboard could be added if you expect small items inside? I am using discarded plastic clam shell cases here for small parts. [click any pic to enlarge]


Recently I have been building carts to hold a number of the larger trays. The whole cart is made from recycled wood.

This one is being used in the garage as a mobile tool cart.

This one as a laundry cart.


Thanks for your interest.

George Plhak
Lions Head, Ontario, Canada

Monday, August 27, 2018

efficient workshop lighting 2

Lighting a work area in a pleasant, safe and efficient manner is about more than just changing light bulbs. I have changed some bulbs, added a few, tried new LED plug in florescent replacements and cleaned the rest. Big improvements! Low cost once you have modern electronic ballasts. Re-use the existing steel box which is often superior to what you'd buy new.

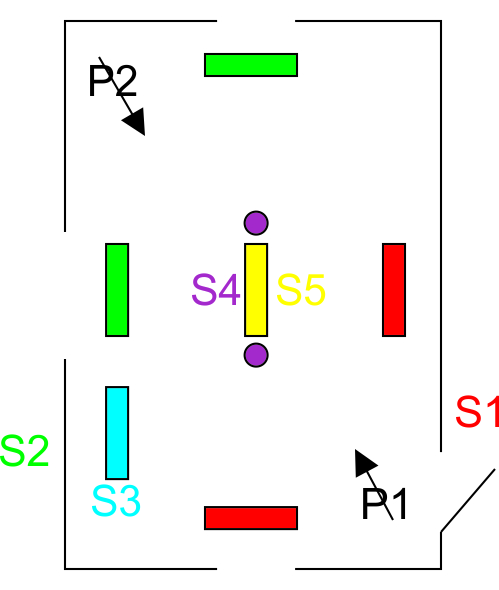
This is a view of my fabrication shop with ALL the lights on. [click any pic to enlarge] The lights in this room are almost NEVER All On. One of my principles of efficient lighting is to only use what I need. I have five lighting "zones" in this one room so I can have the amount and location of lighting that I need.

I switch my lights manually and I am pretty good at remembering to turn off when I leave the room. I tried motion sensing switches but they annoy me. None of these lights are network controllable, all are manual!

When I arrived here five years ago, there were four dual 40 watt T12 florescent lights on the ceiling switchable in two banks. The lights were along the sides of the room. The lamp fixtures were old and some of the lamps didn't work. Some of the fixtures had already been reused and were painted deep red.

Switching on the lights caused interference on my FM radio. See exploring efficient workshop lighting alternatives The title picture is approximately the same view as this article, five years ago (called P2 on the plan below).

Those four fixtures are in the same places (the green and the red banks) but they are now completely rebuilt with new electronic ballasts, new T8 32watt lamps and new lamp mounting posts.

Originally, there was no light in the center of the room. I added a circuit to the panel for an "island" in the center of the workshop ceiling with switchable lights (purple and yellow on the diagram) and a hanging power pendant. Both the lights are controlled with pull switches. Yellow is a High Output (HO) dual 50 watt T5 florescent (100 watt total) and purple are two LED bulbs, each 10watts (20 watt total).

The two LED bulbs provide the lowest level of illumination in the room at a cost of only 20 watts. Perfectly adequate basic illumination from two points near the center of the room.

Later, I added another pull chain controlled dual four foot 32watt T8 fixture over another bench in the bottom corner (blue). This is the fixture I used for the test below.

At move-in the ceiling was dirty white. I painted the ceiling with two coats of pure white latex in patches as I removed fixtures for rebuilding. Now, after four years, the ceiling is again turning a dirty white but not as bad as it was. I should probably repaint it.

Taking down and cleaning the now four year old T8 bulbs has made a huge difference in the room brightness.

The lamp showing the lettering was facing down, the other one is showing the "up" side, the side you normally don't see, the side facing the fixture. The accumulated dirt/dust cuts down the amount of light leaving half of the lamp.

Cleaning! So simple yet so effective! A lot of climbing the ladder in the last two days as I inspected and cleaned the eight fixtures that are now on the ceiling.

I also tried two new LED "instant replacements".

From Philips "InstantFit T8 LED, C$12 each at Home Depot. I bought one each of "daylight" (6000K) and cool white (5000K) so I could compare them. I had intended to buy two of the 6000K and that is what I will end up with since I have decided to return the 5000K after trying it out. The Philips 6000K seems subjectively brighter to me in my shop environment.

I bought Philips 32W replacement LED lamps a couple years ago and have been using them in the paint area. I have been pleased with them, judging them to be similar brightness to 32W fluorescent lamps but instantly full bright but twice the price. I believe two years ago, the Philips LED lamps were on sale at C$30.

I notice that now, the Philips lamps are glass. The earlier ones were encased in a plastic tube which would bend just slightly. The new Philips tubes also have lots of warning labels including about fire hazard. Perhaps the glass is needed for high temperatures? The lamps certainly do get warm, almost as warm as florescent.

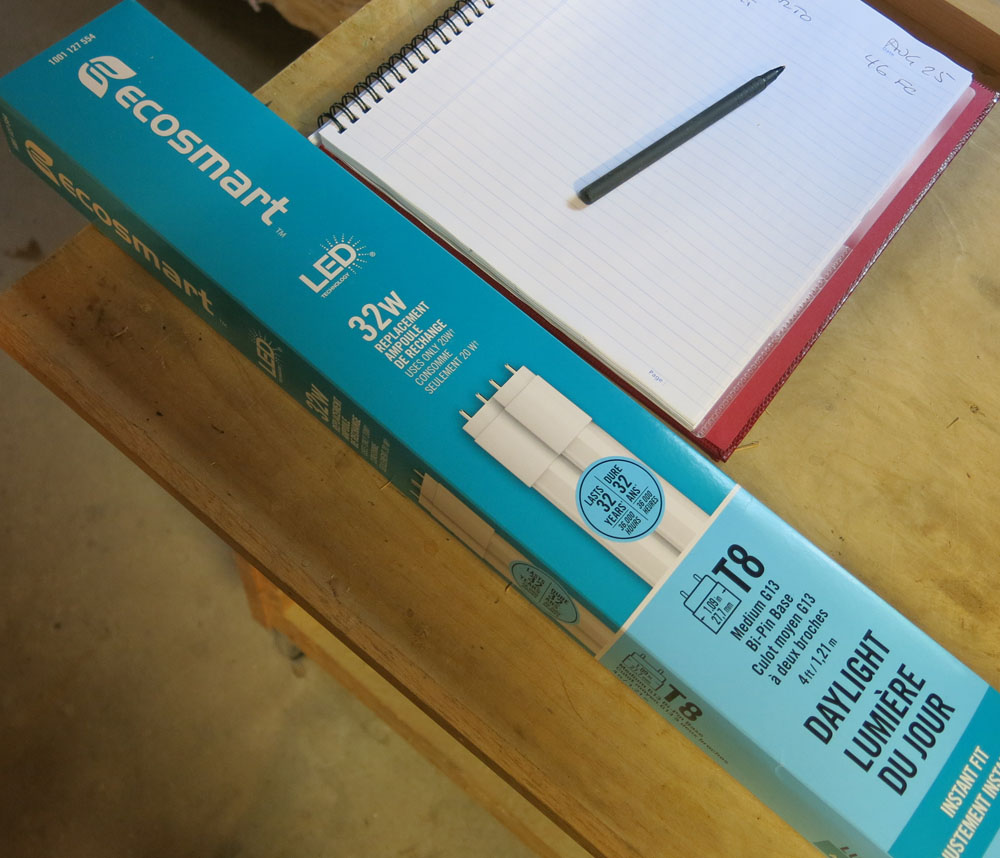
The second type I tested was from Ecosmart, their 32W LED replacement (rated 20w each lamp), two in a pack for C$15 also at HD. Also glass. Far less warning info. Very bright!

Curiously, Ecosmart calls their bulbs "daylight" at 5000K. The naming of color temperature is a bit of a wild west I think, the degrees Kelvin should be a better guide or actually comparing in your own environment. Some time ago I did a piece on comparing conventional, compact florescent and LED bulbs and compared some of the visual effect of different color temperatures.

I installed the Philips and the Ecosmart bulbs in several different fixtures here but made measurements at bench height from the blue fixture


Comparison of lamp types
LampBrightness FCTemp (5 min)
Philips ALTO 32w florescent4635C
Ecosmart 20w LED5233C
Philips 17w LED36.526C

The Philips are not as bright as my typical T8 florescent. The Ecosmart is the brightest. The Ecosmart uses less power than the florescent, but more than the Philips LED.

Temperature was measured with an infrared temperature meter. Brightness was measured with a footcandle meter.

One detail of the comparison is that the LEDs came to full brightness immediately whereas the florescent takes several minutes to come to full brightness. Even longer at near zero temperatures. So the LED has a real advantage in my shop in winter.

Another detail is that general ceiling lighting is good for benchtop brighness but several of the machines, even with light fixtures directly over them, regardless of lamp type, need work lights ahead of the blade since the machine itself shields some of the overhead light. The band saw and the radial arm saw are examples that will need more attention for better safety.

Thank you for your interest,

George Plhak
Lions Head, Ontario, Canada

shop lighting reading list
a parabolic workshop light
led household bulbs
exploring efficient workshop lighting alternatives
work light led retrofit
testing fluorescent light fixtures - the test jig
testing fluorescent light fixtures - the test method (video)
testing fluorescent fixtures - 40 watt
efficient workshop lighting 2 (this article)
updated bench lighting

Tuesday, August 14, 2018

what's an oscilloscope?

I had a couple guys here installing a high tech propane house furnace. Renovations also going on. The house is chaos. I had my Tektronix 7854 and 7L5 in the living room on the cart. One guy asks what it is? I reply the first oscilloscope with a computer. What's an oscilloscope? he asks. It lets you see electricity I replied. He seemed happy with that. Age about 40. What's an oscilloscope?

Thanks for your interest.

George Plhak
Lions Head, Ontario, Canada

Sunday, July 08, 2018

bird strike preventer


About using an old CD, some string, and 3 hook eyes to keep birds from hitting my big windows.

Extensively tested for the past three years.

If you try this, please let me know how it works for you.

Thanks for your interest.

George Plhak
Lions Head, Ontario, Canada

Thursday, May 24, 2018

rain barrels

Rain barrels can save energy and support gardens. They should not cause house foundation flooding. [click any picture to enlarge]

This latest version is now in year two of service. A recent light rainfall of only 1 cm has filled both barrels from empty. I had drained them for the winter.

I have made two identical rain barrels, one for each end of a 21 foot section of seamless eaves trough newly mounted two years before. Highest in the middle each side curves gently downward. There is a downspout outlet near each end. Almost the entire top of the trough is covered with a mesh to keep leaves out. The mesh is sold in packages that give 20 linear feet and I'd have to buy another 20 feet to get the extra foot!

Ideally, both barrels should receive about the same amount of water from their half of the roof and minimal leaves.

The small platform raises each barrel from the existing cement pad so that a watering jug fits under the spout at the bottom (on the other side). All the water in the rain barrel can be used, right to the very bottom.

The straps attached to the house keep winter storms from moving the barrel.

The yellow rod sticking out of the top center of the barrel is the fill gauge. When the barrel is empty, as it has been all winter, the yellow rod only sticks up about 15 cm. Now when the barrel is full, the rod is almost as high as the barrel is tall.

The straight white pipe to the ground is both downspout and overflow. The main flow of water does not go directly into the barrel, as is typical. I've found that relying on overflow over the top edge of the barrel or a drain pipe (which is never as big as the inlet pipe) leads to flooding the area under the barrel when torrential rains fall.

Instead, there is a small "diverter" in the downspout near the top of the barrel. This diverter skims water from the downspout and directs it horizontally through a short length of hose into the top of the barrel, as long as the barrel is not full.

An important feature is that when the barrel is full, flow into the barrel automatically stops and ALL the water from the roof goes down the white pipe to the ground, away from the foundation.

A shallow trench helps water to drain away from the house.

The barrels I used were recycled from the food industry. Mine are from a chicken factory near Toronto. Many food manufacturers have these barrels as surplus and are happy to dispose of them. Mine cost $10 each and once contained soya sauce. I could tell this as they had the factory labels and a bit of dark soya in the bottom. Once washed, these barrels don't smell at all.

The diverter "Catch-A-Raindrop" is an interesting Made in Canada product sold by Home Depot for under C$20.

Here is a data sheet with some explanation.

The diverter fits like a coupler over and inside two sections of downspout. I cut the downspout to the recommended height, inserted the diverter and then added the section of downspout to the ground. A hinged angle coupling mates to the last section of downspout so that it can be lifted for grass trimming.

Here is a company video.

In spite of there being two sizes available from Amerimax, neither matched the downspout size I had so I had to create an adapter. That sits up top of the downspout, under the eaves trough. I have five different styles of gutter system on my old house (round, square, rectangular, plastic, aluminum ...)

From the diverter, a short length of garden hose directs the water into the barrel through a re-purposed electrical connector, making a neat installation.

Carlon "Carflex one piece liquidtight fitting" is intended for another purpose but works great as a 90 degree bulkhead fitting that seals to garden hose perfectly. These are about C$4 at Home Depot.

Here is a data sheet.

It is important to note that that you receive an Amerimax provided cap to seal off the diverter for the winter. You don't want water flowing into the barrel for the winter, so you disconnect the garden hose and cap the diverter. All the winter water runs to the ground with this simple change. I lost the caps so had to buy expensive new ones for the winter.

I was worried that winter ice might cause problems. The downspout was encased in a frozen cascade of ice but the diverter is undamaged.

The barrel tap is made up of a standard bronze plumbing valve with a threaded joint and a matching plastic "bulkhead fitting" available at a farm store. These come in many sizes. I used one inch which were about C$15 and the tap was about C$8. I could have used a plastic ball valve here.

For the holes, I used a hole saw in a drill. The barrel is HDPE 2 and is easily cut with regular wood tools.

The bulkhead fitting is reverse threaded so that it tightens in the counter clockwise direction. It also must be assembled with the sealing O Ring on the INSIDE of the barrel.

Because I needed access to the INSIDE of the barrel for the fittings and also because I wanted to be able to clean out the barrel easily, I cut out the tops of the barrels. I left a small lip around the rim of about 3cm which the lid can sit on.

I started by drilling a small hole in the center of the top. I then used a compass to scribe a circle on the top. The circle size was set by how close I could fit my jigsaw against the inside edge of the barrel lip. I wanted a lip but it turned out I got it by default.

The top of the barrel has two large fittings. My jigsaw would come close to, but would not cut between these fittings and the edge. To continue my cut around these fittings, I used a oscillating (or vibrating or multi) tool with a short straight saw cutter. It worked beautifully.

The bottom part of the picture shows the edge I achieved after a bit of effort with a wood rasp. The edge is smooth and safe.

This was my first attempt for a lid/top. The disk is waterproof plywood completely paint coated, including the inside of all the holes. Clearly I wasn't thinking about overflow at all!

Also, because there was a bit of a gap between the downspout and the lid, it was possible for mosquitoes to enter the barrel and lay their eggs in the water, which they did. When I removed the lid after a week, I could see the larva swimming.

A rain storm event caused catastrophic overflow right next to my house foundation. This is when I found the Catch-A-Raindrop and decided to include it.

The large square hole I had made in the lid could be used for a level gauge.

The level gauge is a plastic fishing float with the center push button removed, glued to the end of a fiber glass rod driveway marker.

The rod passes through a small brass cylinder glued into a wooden disk of the same painted waterproof plywood. The small brass rod is not really necessary. A hole drilled through the disk just slightly larger than the rod would do just fine.

The level gauge is a handy feature.

Finally the lid and the gauge are fastened with small stainless steel wood screws. Opening the lid is easy to check for debris and insects.

The Catch-A-Raindrop diverter prevents insect access to the barrel.

My total cost was about C$60 per barrel.


I am not meaning to pick on Home Hardware particularly but wanted to illustrate the cost of commercial product and to point out that this one does not seem to have any overflow protection? The water is poured in through the top mounted "insect screen". Where does water go when the barrel is full? Also wondering about the purpose of the two taps with one half way up the barrel? Also the water capacity is only 42 Gal rather than 55 Gal. Also, no recycling as when an otherwise surplus food barrel can be used.

rain barrels part 2

Thank you for your interest.

George Plhak
Lions Head, Ontario, Canada