Addendum to fixing led string lights.
An example of fuses in a string. Two of the tiny 10mm 3A fuses down in a recess in the plug.
[click any pics to enlarge]
I found it helpful to use a small flat screw driver to push open the tiny cover.
Tiny fast blow 3.0 amp 10mm fuses. You can buy them at Amazon in a larger lot for about 50 cents each. Beautiful laser engraved printing on one end cap.
I've had a chance to look carefully at two strings of more recent (2018 manufacture) from the same company. One has 25 C9 bulbs (top) while the other has 35 C6 bulbs (bottom).
There are significant changes in the strings to what I described previously.
I am sorry to say that the LEDs on both newer strings are NOT REPLACEABLE. I highlighted the corrosion that appeared in the ones I looked at earlier. Apparently the manufacturer has done away with "repair-ability".
Fuses protect from overloads if the user, for example, plugs too many strings together in series. Only the C9 string has fuses in the plug, the C6 string does not. The C9 string came with two spare fuses in a small baggy taped to the plug. Two fuses protect both the line and the neutral since the plug and socket are not polarized.
If either of the two fuses is blown (open circuit) the LED string will not light, nor will another string plugged into it at either the end socket or the feed through socket on the back of the plug. Both are fed by the fuses.
The bulb assemblies of both are masterpieces of precision injection molding. These will not come apart without damage. Probably water tight except for the plug and socket.
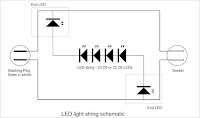
The same 3 wire arrangement is used on both newer strings. Two conductors go from plug to socket to carry the line circuit to the next string. The LEDs in the string are all in the third line, down the center if you will. At the plug end, the LEDs connect to the fuse side of the line. At the socket end, the LED string connects to the neutral. Actually, the plug and socket are not polarized, so there is no line and neutral in that sense, but there really is!
There is no canister containing extra parts like resistors or blocking diodes in the newer strings.
Except for the two LEDs nearest the ends, all LEDs have two wires out the bottom. All are in a series string. There is no physical indication of polarity (cathode/anode) on the outside of the bulb assembly, so if you are going to be cutting them out of the string, you'd better mark for orientation or be prepared to test for polarity later.
The end LEDs have three wires coming out the bottom. On each, two of the wires are connected together and to one side of the LED. The third wire is to the rest of the string. The C9 bulb string is pictured.
It is worth noting that at each end, it is the center conductor of the 3 wire LED base that goes to the socket or plug.
Thanks for your interest
George Plhak
Lions Head Ontario Canada
This is an addendum to fixing led string lights.


2 comments:
We have a newish C9 string and as you say, the bulbs are no longer fixable. We can't find a fuse door in the male plug, either. There is a sort of door that opens where the wires go in, but no sign of a fuse.
Thank you for taking the time to document the circuitry and posting it on the internet. I found it very helpful in troubleshooting a string of LEDs I purchased from Amazon. Instead of removing each LED, I fashioned a straight pin on the end of the leads to a multi-meter. Moving along the strand of LEDs I pierced the in and out wires to each LED. With the red lead on the anode and the black lead on the cathode the LED would light. I found one LED that wouldn't light and it turned out to be the actual wire to be open. The LED itself was okay. I removed the two leads from the LED socket and found one of the leads crimped over the insulation of the wire. This made for an intermittent problem. Your schematic helped me to understand that the LEDs were in a serial arrangement. The multi-meter helped me determine the anode and cathode leads for the LEDs. The actual time to isolate the problem was 20 minutes.
Thanks again.
Post a Comment